Chapter 2: The FSU SEM User Manual
How to use the SEM
The SEM in the FSU Biology department is a Cambridge Instruments Stereoscan
S100 Scanning Electron Microscope that does all of its imaging using secondary
electrons. The room housing the electron microscope and related equipment
is housed in the first door on the right off the stairwell which passes by
the Greenhouse in Tawes hall. The first step that needs to be taken before
using the SEM is to prepare the specimen for viewing in the SEM. There are
three conditions that a sample must meet in order to be viewed in the SEM
and to prevent damage to the microscope:
-
The sample should be desiccated (i.e. contain no water) and should
be free of solvents, oil from human skin, and anything else that could boil
away in a vacuum.
-
The sample MUST be electrically conductive.
-
The sample must be properly mounted on a specimen stub.
The first two criteria are generally more of a problem for someone who wishes
to view biological samples and for someone who wishes to view a non-conductive
non-biological material (ceramics or plastics, for example ).
The procedure for preparing a biological sample, such as some sort of plant
material is as follows:48
-
Cut the plant up into manageable pieces.
-
Put the pieces into a vial with a cap.
-
Pipette Gluteraldehyde fixative solution into vial until half full (helps
to preserve cellular structures).
-
Let sit for 2 hours.
-
Pipette out Gluteraldehyde.
-
Add a 35% Ethanol solution to dehydrate sample.
-
Let sit for 1 hour.
-
Pipette out the 35% Ethanol solution and replace with a 70% Ethanol solution.
-
Let sit for one hour.
The specimen should then be allowed to dry so that all the Ethanol can evaporate
from the sample. The sample now should be treated in a sputter coater to
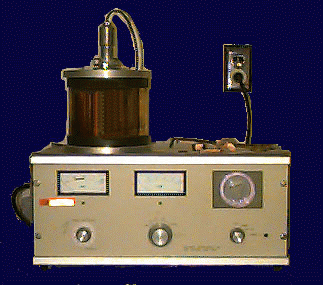
make it electrically conductive. Click here to see
what a sputter coater looks like.
What is a Sputter Coater?
Any sample to be viewed using the SEM must be electrically conductive.
If the experimenter wishes to view a metallic or semiconducting sample, the
sample is just affixed to the viewing stage with conductive carbon cement.
However, if the researcher wants to view anything non-conductive under the
SEM(biological samples, ceramics, some plastics, etc.), then the sample must
be coated with an extremely thin, evenly applied conducting film of gold.
This is basically what the sputter coater does. The sputter coater coats
a sample by depositing a thin film of ionized gold atoms on the specimen
in an Argon atmosphere(to prevent the gold ions from reacting with atmospheric
gases, since Argon is a noble gas and thus inert).
Proper Usage of the Sputter Coater:
-
Lift the lid of the sputter coater.
-
Place prepared specimen to be coated on table inside the sputter coater.
-
Replace the lid.
-
The black switch is the Leak Valve. Flip it down (i.e. towards the operator).
-
Turn on the pump switch.
-
Turn on the pressure gauge switch.
-
Turn on the Argon tank via the screw knob on the top of the tank.
-
Screw in the silver "Scientific Company" brass handle on the sputter coater.
-
Leak Argon into the chamber by turning the small silver Knob on the sputter
coater. Let the Argon leak into the chamber for a few minutes, until the
pressure gauge reads 250.
-
Open the brass screw on the clear plastic hose by screwing it counter-clockwise
until you hear the gas begin to leak into the chamber. This is replacing
the air in the sputter coater with Argon.
-
Close the small silver leak knob on the sputter coater
-
Turn on the heater switch on top of the sputter coater.
-
Turn the black knob on the front panel of the sputter coater 1/2 way, until
a purple glow is visible. Look for an eveness of purple color and DO
NOT let it arc. This will result in ionized argon, which is chemically
reactive and the result will be a sample which is not evenly coated with
gold.
-
Set the timer for 2 minutes.
-
After the 2 minutes have elapsed, turn down the black knob.
-
Switch off the output gauge.
-
Turn off the argon
-
Switch off the pump.
-
Open the black leak knob slowly.
-
Remove samples from the sputter coater.
For most physics and engineering students, however, sample preparation is
actually quite easy. Most specimens that would be of interest to students
in either of these majors are already conductive, such as metals and
semiconductors. The procedure for preparing electrically conductive samples
is as follows:
-
Put on rubber gloves and wash hands to remove powder from the outer surface
of the gloves.
-
Clean specimen stubs under the ventilation hood in the SEM lab with a lens
cloth saturated with acetone and allow the stubs to dry for approximately
10 to 15 minutes.
-
Clean sample with acetone if possible. Some substances react negatively with
acetone.
-
If the sample can not be cleaned with acetone, use another cleaning method
(i.e. a different solvent, polishing with special abrasives, or ultrasonic
cleaning).
-
Mix the conductive carbon cement well under the ventilation hood.
-
Affix the sample(s) to the stub(s) using the cement. Use plenty of cement
(the electron beam has kinetic energy!), but do not get any cement on an
area of interest.
-
Allow the cement to dry for 15 to 20 minutes.
NOTE: It is an excellent idea to make a diagram of the box holding
your stubs so you know which sample is which!
-
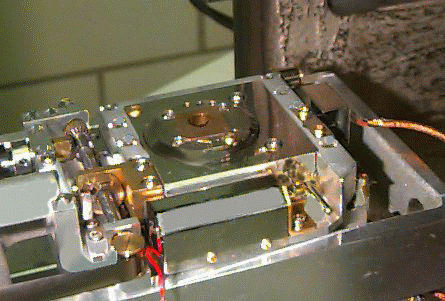
Place in the SEM (while wearing rubber gloves) using the stub tweezers located
on the SEM. The stubs go in a stage similar to the one in the following picture
(the stub holder on the stage is the copper colored area) :
After the samples have been properly prepared, you are now ready to use the
SEM. There are a few important procedures to follow to insure that good imaging
results are obtained and the SEM is not damaged. Some of these advisories
will not become clear until you read the next two sections, but I will mention
them now so they will be fresh in your mind.
-
The SEM is ALWAYS kept pumped down (evacuated) when not in use. This
helps to prolong the life-span of the filament and o-rings. Therefore, NEVER
EVER just open the sample chamber door! The sudden influx of air will
almost certainly damage the SEM.
-
NEVER rapidly crank up the filament to its maximum voltage. This will cause
the filament to burn out.
-
ALWAYS wear rubber gloves when putting anything into or taking anything out
of the SEM.
-
NEVER vent the sample chamber when the filament is on. This will burn out
the filament.
-
ALWAYS turn the filament off before disengaging the beam. This also helps
prolong the life of the filament.
-
If you have a question about operating the SEM, sample preparation, or need
assistance OF ANY KIND call Dr. Morton (his number is posted
above the phone in the sample preparation lab): 687-4355; or Dr. Hoffman:
687-4160 and ASK!
Following the above caveats will help to ensure a successful session with
the SEM for yourself and others. The two sections showing the procedures
for verifying that the SEM is functional and for imaging with the SEM are
located at the end of this report in flow chart format. These procedures
are also included in the instructional manual for using the SEM that is located
in the same room as the SEM.